How to upgrade docker to 1.6.0 on OSX via homebrew
So simple, but few my friends has problem with this. The key point is to perform boot2docker upgrade which upgrade ISO image.
1 | brew update |
How to upgrade docker to 1.6.0 on OSX via homebrew
So simple, but few my friends has problem with this. The key point is to perform boot2docker upgrade which upgrade ISO image.
1 | brew update |
I wanted to try new programming language. A language that is trivial and complex at the same time. Trivial to write fast, complex when struggling with performance or when you want state of art architecture.
This week I decided to try Rust . Rust is an expression-based language. What this mean? In general expression is collection of symbols that jointly express a quantity (or simply expression produce at least one value). But there are also statements which may be smallest standalone elements of an programming language or in other words statements are building blocks of the program.
In Rust everything is an expression, but in general we have two kind of statements. First is an binding statement (for example statement declaration) and second is expression statement, which purpose is to turn any expression into statement (for example adding ; at the end of the line). Why I even write this? Look at this if example which is statement.
1 | let y = if x == 5 { 10 } else { 15 }; // y: i32 |
Notice that there are no semicolons after 10 and 15. This means that those are expression, and ‘if’ is an expression to, which mean that you can assign if result to y.
After reading the first part of the Rust Book I decided to write my first program. I decided to write quick sort. Here is the code.
Lessons learned:
1 | let length = Inches(3); |
Rust is about performance. Many of abstractions are done at compile time. There is said that new programers are fighting with compiler. I can confirm that. Once you gain more experience, it is all becoming easy for you. I have to admit that I’ve similar situation with Scala.
Experience of learning my first programming language came to me when in book pass-reference-by-value was discussed.
Rust take pointers to the whole new level. There are mutable references, boxes and more.
But in fact pointers are an introduction to Rust memory aspect such as: Ownership, Borrowing, Boxes and Lifetimes.
I’ve great time playing around and checking what will work and what not. This is a recommended part of the book and this article for further reading.
For me it was good learning journey to read and try new Language. What will be next? Maybe Go or Haskell.
Gerrit and maven release plugin
There is a time in your project when you start using Gerrit code review system. When you have maven release plugin to make release, you can be very surprised when you see:
1 | [ERROR] The git-push command failed. |
This is a situation when we use ssh connections to gerrit. But, when you try to push something to master (ignoring code review), it works! How is that possible?
You probably have in your gitconfig an ssh URL with your user name. But in your project SCM (in pom.xml) you do not have your user name. What user name maven release plugin use? Your computer account name, which is in most cases different than your Gerrit user name.
How to repair it? Define a file in .ssh/config directory with content:
1 | Host gerrit |
There may be a lot of other reason why you have Premission denied, but this was the hardest I’ve ever seen.
In my team, there is 20% of OS X machines, rest are linuxes. We share one script, that everyone on our team uses.
That script was written by some guy on Ubuntu and guess what? GNU versions of those programs (sed and xpath) are not compatible with BSD versions. The script was failing :(
I was trying to improve the script, but forget about it. Just use GNU programs.
To install gnu sed on osx via homebrew type the following:
1 | brew install gnu-sed --with-default-names |
To install gnu xpath on osx via homebrew type the following:
1 | brew tap concept-not-found/tap |
New methods in Map.Entry comparingByKey and comparingByValue
JDK 8 is still new and hot. I have explored some new methods in Map.Entry interface, to sort objects.
Image that we have following collection:
1 | Map map = new HashMap<>(); |
There are four new methods:
comparingByKey()comparingByKey(Comparator<? super K> cmp)comparingByValue()comparingByValue(Comparator<? super K> cmp)The method names are self-describing. If we pass different comparator, we can get different behaviour.
If we want to sort by value with default behaviour (ascending), we can do something like this:
1 | List<Map.Entry<String, Integer>> comparingByValue = map |
As a result, we get a list sorted by values:
1 | Honda=1 |
If we want to sort by key with default behaviour (ascending), we can do something like this:
1 | List<Map.Entry<String, Integer>> comparingByKey = map |
As a result, we get a list sorted by keys alphabetically:
1 | Honda=1 |
If we want to sort by key length, we can pass function as a comparator, Then we can achieve something like this:
1 | List<Map.Entry<String, Integer>> comparingByValue = map |
As a result, we get a list sorted by keys length:
1 | Honda=1 |
This post describes, my experiments with git ls-files command.
In repository, we have files:
1 | .DS_Store (Mac OS X, folder settings file) |
This command show us, all committed files and staged files.
1 | $ git ls-files |
This command show us, all files that are ignored or untracked. Those files are called ‘other’.
1 | $ git ls-files --others |
This command show us, all others files, without ignored files. Option exclude-standard means that standard git exclusion files are included.
1 | $ git ls-files --others --exclude-standard |
This command show us, all files that are ignored.
1 | $ git ls-files --ignored --others --exclude-standard |
In my global git ignore file, there is a rule to ignore all .DS_Store files. In my local git ignore file, there is a rule to ignore ignoredFile file.
Trigger Jenkins build from BitBucket
W tym poście przedstawię jak zrobić, aby natychmiast po wypchnięciu zmian do BitBucket.org serwer ciągłej integracji rozpoczął proces budowania aplikacji.
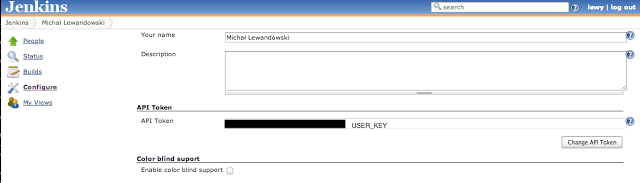
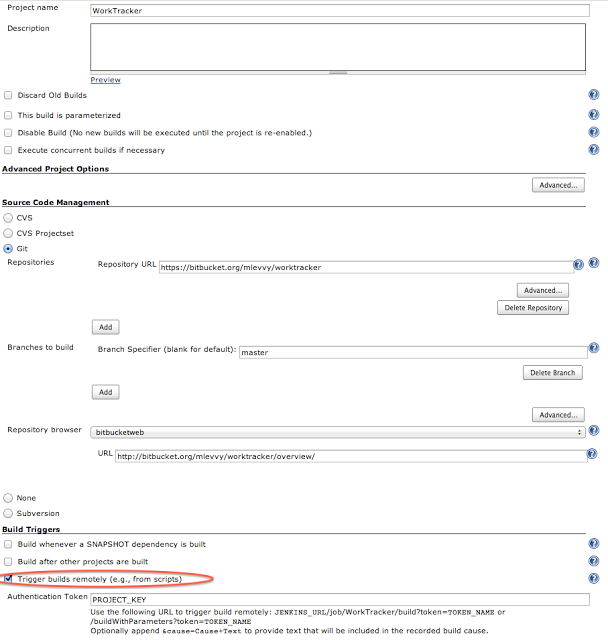
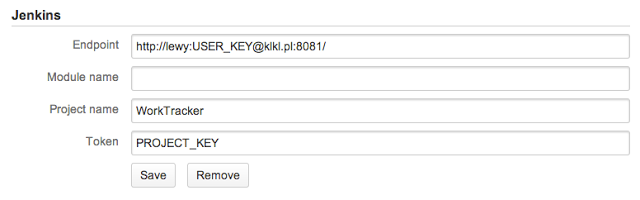
http://lewy:USER_KEY@klkl.pl:8081/job/WorkTracker/build?token=PROJECT_KEY
Po wykonaniu tej operacji, nasz serwer Jenkinsa powinien ruszyć z nowym procesem budowania.
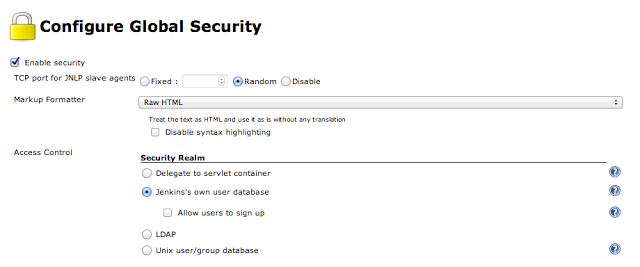
BitBucket’a konfigurujemy tak jak na screenie przedstawionym poniżej:
Jeżeli tak skonfigurujemy nasze środowisko, po pchnięciu zmian, serwer ciągłej integracji, powinien automatycznie rozpocząć budowanie aplikacji.
Niestety BitBucket nie udostępnia żadnych logów, więc jeżeli coś nie działa, to pozostaje nam próbować zmieniać coś w ciemno, aż zadziała.
Ostatnio przechodziłem z HibernateSessionFactory konfigurowanego w kodzie na hibernate.cfg.xml.
Wiąże się to z zamianą mapowań, których może być w dość dużo w projekcie:
1 | configuration.addAnnotatedClass(pl.myproject.MyClass.class); |
Każda klasa reprezentująca encje musi zostać zamieniona na coś takiego:
1 | <mapping class="pl.myproject.MyClass"> |
Najprostsze rozwiązanie jakie przychodzi to użycie zamiany z użyciem wyrażenia reguralnego. W naszych IDE należy włączyć tryb zamiany z użyciem wyrażenia reguralnego. W polu “find” definiujemy:
1 | configuration.addAnnotatedClass\((.*).class\); |
W polu “replace” definiujemy:
1 | <mapping class="$1"></mapping> |
Klikamy “Replace All” i zrobione. Nie ma tutaj nic trudnego. Wybranie pierwszego podzbioru za pomocą dwóch nawiasów i wstawienie tego za pomocą $1.
Proste,a nawet banalne.
Za pewne każdy edytor tekstu potrafi takie rzeczy, jednak odnoszę wrażenie, że zbyt często próbujemy robić takie rzeczy ręcznie.
Tomcat cluster with mod_jk sticky session session replication
Przewodnik o tym jak zrobić klaster złożony z dwóch instacji tomcata połączonego load balancerem apache mod_jk i jak uruchomić replikację sesji oraz sticky-session. System operacyjny to lubuntu 11.10.
Z góry przepraszam, za dość surowe komendy. Nie jest to tutorial krok-po-korku ani książka, żeby rozlegle wszystko opisywać. Jest to tylko ściągawka na przyszłość, lub ekstrakt z tego co trzeba zrobić.
Adres IP należy zmienić z 10.0.0.90 na localhost czy gdzie tam wasz serwerek się znajduje.
Zainstaluj:
1 | apt-get install apache2 libapache2-mod-jk2-mod-jk |
Utworz katalog:
1 | /tcluster/instance1 |
Pobierz Tomcata i rozpakuj zawartość do tego katalogu.
/etc/apache2/workers.properties:1 | worker.list=loadbalancer,mystat |
Ważna jest nazwa workera ( worker1 oraz worker2 ) adres IP oraz port.
/etc/apache2/ports.conf dodaj: 1 | Listen 8585 |
Zmień zawartość pliku /etc/apache2/mods-enabled/jk.conf na:
1 | JKWorkersFile /etc/apache2/workers.properties |
Dodaj nasłuch na porcie 8585 dla mod_jk. Zmień plik /etc/apache2/sites-enabled/000-default
1 | <VirtualHost *:8585> |
Zmień plik /tcluster/instance1/conf/server.xml tak aby przypominał:
1 | ... |
Connectora się odkomentowywuje, jvmRoute trzeba dopisać, pole cluster się odkomentowywuje.
Ściągnij z PSI Probe i umieść go w katalogu webapps. Jest to aplikacja która może się później przydać.
Dodaj użytkowników do tomcata. Zedytuj plik /tcluster/instance1/conf/tomcat-users.xml:
1 | <tomcat-users> |
Przejdź do katalogu: /tcluster/instance1/webapps.
Zmodyfikuj _examples/WEB-INF/web.xml_ dodając distributable:
1 | <tomcat-users> |
1 | <Server port="8006" shutdown="SHUTDOWN"> |
Uruchamiamy wszystko:
1 | /etc/init.d/apache start |
Testy przeprowadzić najlepiej za pomocą aplikacji z przykładów:
W moim przypadku jest ona dostępna pod adresem: http://10.0.0.90:8871/examples/servlets/servlet/SessionExample
Mamy trzy porty HTTP:
Po dodaniu jakiegoś aktrybutu sesji i zmianie portu z 8871 na 8872 powinniśmy mieć ten sam SessionID (Sticky-session) oraz te same atrybuty(Replikacja sesji).
http://10.0.0.90:8585/jkstatushttp://10.0.0.90:8871/probe oraz http://10.0.0.90:8872/probe